Honda crv starter motor replacement requires an understanding of the vehicle’s components and the role the starter motor plays. The starter motor is essential for starting the engine by converting electrical energy from the battery into mechanical energy to crank the engine. When the starter motor fails, the vehicle will not start, making it crucial to address any issues promptly. This guide aims to assist in replacing the starter motor effectively and safely, offering step-by-step instructions to facilitate the process. By following these guidelines, the task can be performed with confidence and precision.
Identifying a Faulty Starter Motor
Recognizing the signs of a failing starter motor is essential for timely intervention. Symptoms to watch include a clicking noise when the ignition key is turned, a slow or unresponsive engine crank, or the engine failing to start. Initially, it is prudent to inspect the battery, as a weak or dead battery can produce similar symptoms.
This can be done by checking the battery’s voltage and ensuring the terminals are clean and properly connected. If the battery is in good condition, the focus should shift to the starter motor.
It may also be helpful to examine the alternator and other electrical components to rule out other potential causes. Conducting a thorough diagnostic process ensures accurate identification of the problem.
Tools and Equipment Required: Crv Starter Motor
Specific tools and equipment are indispensable when replacing the crv starter motor.
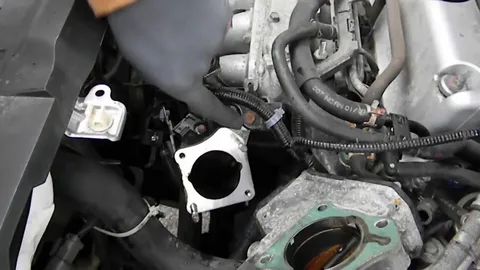
Unbolting the Starter Motor
Essential tools include a ratchet and socket set for unbolting the starter motor, screwdrivers for disconnecting electrical connections, and pliers for handling various clips and wires.
Jack and Jack Stands
A jack and jack stands are also required to safely lift the vehicle and provide adequate access to the starter motor.
A Multi meter
Additionally, having a multi meter can be beneficial for testing electrical connections and ensuring all components function correctly.
Organize Nuts, Bolts
Keep a clean workspace to organize nuts, bolts, and other small parts during replacement.
Preparing Your Honda CR-V
Before beginning the replacement process, position the Honda CR-V on a flat, stable surface. Ensure the ignition is fully turned off to prevent any electrical incidents. Disconnect the battery to eliminate the risk of electrical hazards during the task. Carefully lift the vehicle and place it securely on jack stands using a jack.
This setup provides the necessary access to the starter motor while maintaining safety throughout the procedure. Confirm the vehicle’s stability on the jack stands before moving underneath to avoid accidental movement. Preparing in this manner sets the stage for a smooth and efficient starter motor replacement.
Removing the Old Starter Motor
Ensure the Honda CR-V is securely positioned on jack stands, providing safe access to the vehicle’s underside. Locate the starter motor, which is generally found near the lower part of the engine block. Use a ratchet and appropriate socket to unbolt the starter motor from its mounting bracket.
Carefully disconnect the electrical connections, including the wiring harness and associated terminals. Handle these connections gently to avoid damaging the wiring or connectors. It might be necessary to man oeuvre around other components, so take caution to prevent accidental disconnections or damage to nearby parts.
Keep all fasteners, bolts, and washers in a designated area for easy retrieval during reinstallation. The starter motor should be removed methodically to avoid any inadvertent mishandling or misplacement of parts. Once detached, the old starter motor can be set aside for the new unit.
Inspecting Related Components: Honda Crv Starter Motor
With the Honda Crv Starter Motor removed, the opportunity arises to scrutinize surrounding components for potential issues.
Special Attention
Pay special attention to the wiring and connection points, looking for any signs of wear or corrosion that could affect the new starter motor’s performance.
Bracket and Bolts
Additionally, inspect the mounting bracket and bolts for any signs of damage or wear, as these parts are crucial for securing the new starter motor in place.
Bolts Are Stripped
If the bracket appears bent or the bolts are stripped, consider replacing them to avoid future problems.
Good Condition
Ensuring that all related components are in good condition will contribute to the new starter motor’s overall reliability and longevity.
Necessary Adjustments
Proper inspection and necessary adjustments at this stage can prevent potential issues after installation.
Installing the New Starter Motor
Position the new starter motor in place, ensuring it aligns correctly with the mounting holes. Use the bolts that were removed earlier to secure the motor firmly. Carefully reattach the electrical connections to their respective terminals, ensuring each connection is tight and secure.
This will ensure the new starter motor functions properly. Please pay close attention to the wiring, ensuring it is routed correctly and free from obstructions or potential pinch points. Verify that all connections are correctly fitted, using the original fasteners and clips where applicable.
This meticulous approach helps to prevent any loose connections that could affect performance. Once all components are correctly secured, double-check that the starter motor is firmly in place and that no wires are exposed or likely to become damaged. This careful installation process will help to ensure the new starter motor operates effectively and reliably.
Testing the Installation: Engine Starter Motor Honda CR-V
With the new Engine Starter Motor Honda CR-V installed, the next crucial step involves verifying its proper function. Reconnect the vehicle’s battery, ensuring all terminals are secure. Turn the ignition key to the start position and observe the engine’s response.
Listen closely for unusual noises, such as grinding or clicking, which could indicate issues with the starter motor or its installation. The engine should start smoothly, without hesitation or irregular cranking patterns. If the engine fails to start, re-evaluate the electrical connections and the alignment of the starter motor.
Double-check that all bolts are tightened and that the wiring harnesses are correctly connected. Testing the vehicle’s electrical system using a multi meter to ensure consistent voltage delivery to the starter motor is also advisable.
Maintenance Tips
Routine maintenance of the starter motor and its associated components can prevent unexpected issues and prolong the longevity of the new installation.
- Regularly inspect the battery to ensure it is functioning optimally, as a weak or failing battery can place additional strain on the starter motor.
- Clean the battery terminals to prevent corrosion, which can impede electrical connections.
- It’s essential to periodically check the tightness of the starter motor’s mounting bolts.
- Vibration from the engine can sometimes cause bolts to loosen over time, which could lead to poor performance or damage to the starter motor.
- Additionally, inspect the wiring and connectors for any signs of wear or corrosion.
- Ensuring that all electrical connections are secure and free from damage is crucial for maintaining a reliable starter motor.
Prevent More Significant Failures
Pay attention to the vehicle’s performance during start-up. Unusual sounds such as grinding, clicking, or a slow cranking engine can indicate potential problems with the starter motor or related components. Addressing these issues promptly can prevent more significant failures and costly repairs in the future.
Moreover, it’s advisable to have the vehicle’s charging system, including the alternator and voltage regulator, checked regularly. An efficient charging system ensures the battery remains adequately charged, providing the necessary power to the starter motor.
Regular servicing can also benefit the starter motor by keeping the vehicle’s engine in good condition. A well-maintained engine is easier to start and places less demand on the starter motor.
Post-Installation Testing
Attention to detail is paramount during both the removal of the old starter motor and the installation of the new one. Ensuring all electrical connections are secure and components are correctly aligned will prevent potential problems. Post-installation testing confirms that the new starter motor is functioning as intended.
Adopting regular maintenance practices, such as inspecting the battery and ensuring secure connections, can extend the lifespan of the starter motor. Additionally, promptly addressing unusual sounds or performance issues can prevent more serious failures.
For those unsure about any part of the process, seeking professional assistance can mitigate the risk of errors. Proper care and adherence to maintenance recommendations will contribute to the starter motor’s reliable performance and the vehicle’s overall health.
Conclusion
Honda crv starter motor replacement demands a methodical approach and the proper tools. Following the outlined steps ensures that the process is executed safely and efficiently. Recognizing the signs of a failing starter motor and conducting a thorough diagnostic to rule out other issues is essential. Equipping oneself with the necessary tools and preparing the vehicle adequately forms the foundation of a successful replacement.
FAQs
FAQ 1: What tools do I need to Honda crv starter motor replacement?
Answer: You’ll need for Honda crv starter motor replacement:
- Socket wrench set
- Screwdrivers (Phillips and flathead)
- Jack and Jack stands
- New starter motor
- Safety gloves and goggles
FAQ 2: What are the basic steps to replace the starter motor in my Honda CR-V?
Answer: Ensure safety by disconnecting the battery. Use a jack and jack stands to safely raise the vehicle and access the starter motor from underneath. Disconnect the wiring harness, remove any mounting bolts, and remove the old starter motor. Position the new starter motor, secure it with mounting bolts, and reconnect the wiring harness.
FAQ 3: How can I ensure the replacement starter motor works appropriately in my Honda CR-V?
Answer: Reconnect the battery after installing the new starter motor. Turn on the ignition and start the engine to check that the new starter motor engages and cranks the engine smoothly. Pay attention to any unusual noises, which could indicate issues that need addressing.
| Related Business Listings |
| Contact Directory |
| Local Business Profiles |