In the competitive world of eCommerce, every detail counts when it comes to optimizing your online store for conversions. One of the most effective ways to enhance the shopping experience is by implementing a sticky add to cart WooCommerce button. This feature allows customers to add products to their cart without having to scroll back to the product page, streamlining the shopping process. In this article, we’ll explore how to add a sticky Add to Cart button while ensuring that your WooCommerce store remains fast and responsive. We’ll also look at how to integrate a mini cart for WooCommerce, providing an efficient and user-friendly experience.
Understanding the Sticky ‘Add to Cart’ Button
A sticky Add to Cart button is a persistent button that remains visible on the screen as users scroll through a product page. This feature simplifies the purchasing process by allowing customers to add items to their cart without disrupting their browsing experience. It’s especially useful for stores with a wide range of products, as it eliminates the need for repetitive scrolling.
Benefits of a Sticky ‘Add to Cart’ Button
- Enhanced User Experience: By keeping the Add to Cart button accessible, you minimize friction in the shopping process. Customers can quickly add items without navigating back to the button.
- Increased Conversion Rates: The easier it is for customers to add items to their cart, the more likely they are to complete their purchases. A sticky button can significantly boost your store’s conversion rates.
- Reduced Abandonment Rates: When customers can easily add products to their cart, they are less likely to abandon their shopping sessions, leading to higher overall sales.
How to Add a Sticky ‘Add to Cart’ Button
Adding a sticky Add to Cart button to your WooCommerce store involves several steps. While the process may seem daunting, it can be accomplished without slowing down your site’s performance. Here’s how to do it:
Step 1: Choose the Right Plugin
The easiest way to implement a sticky Add to Cart button is by using a plugin. Several options are available, but it’s essential to choose one that is lightweight and optimized for performance. Brand Extendons offers a range of WooCommerce extensions that can help you achieve this without compromising speed.
Step 2: Install and Activate the Plugin
- Go to your WordPress dashboard.
- Navigate to Plugins > Add New.
- Search for your chosen sticky button plugin (e.g., Sticky Add to Cart for WooCommerce).
- Click Install Now and then Activate the plugin.
Step 3: Configure the Plugin Settings
Once activated, you’ll need to configure the plugin settings to customize the appearance and behavior of your sticky button. This usually involves:
- Position: Decide where you want the button to appear on the page. Common options include the bottom of the screen or as a floating button on the right side.
- Design: Customize the button’s color, size, and text to match your store’s branding.
- Animation: Choose how the button appears when the user scrolls. A smooth fade-in or slide-in effect can enhance the user experience.
Step 4: Test for Performance
After configuring the sticky button, it’s crucial to test your site’s performance. Use tools like Google PageSpeed Insights or GTmetrix to analyze your site speed. Ensure that the addition of the sticky button does not significantly impact load times or user experience.
Step 5: Monitor User Interaction
Once your sticky Add to Cart button is live, monitor user interaction through analytics tools. Look for changes in conversion rates and overall user engagement. Adjust your settings based on the data to optimize the button further.
Integrating a Mini Cart for WooCommerce
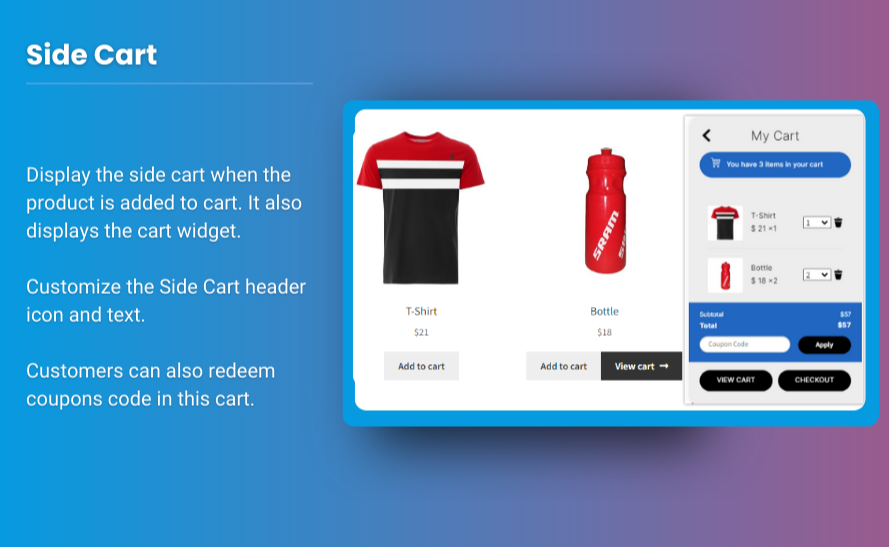
In addition to a sticky Add to Cart button, implementing a mini cart for WooCommerce can enhance the shopping experience. A mini cart allows customers to view their selected items without leaving the current page, further streamlining the purchasing process.
Benefits of a Mini Cart
- Quick Overview: Customers can quickly see what’s in their cart, making it easier to make purchasing decisions.
- Encourages Additions: When users can easily view their cart, they may be encouraged to add more items, increasing the average order value.
- Simplified Checkout: A mini cart can facilitate a smoother checkout process, as users can proceed to checkout without navigating away from their current page.
How to Add a Mini Cart
To add a mini cart for WooCommerce, you can also use a plugin. Here’s how to do it:
- Select a Mini Cart Plugin: Look for plugins that offer a responsive and lightweight mini cart solution. Brand Extendons provides a selection of options that integrate seamlessly with WooCommerce.
- Install and Activate the Plugin: Follow the same installation steps as for the sticky button plugin.
- Configure Mini Cart Settings: Once activated, you can customize the mini cart’s appearance and behavior:
- Position: Decide where the mini cart will appear on the page (e.g., in the header, sidebar, or as a dropdown).
- Design: Customize colors, fonts, and sizes to ensure it matches your store’s branding.
- Functionality: Set options for whether the mini cart updates automatically when items are added.
- Test the Mini Cart: Just like with the sticky button, test your mini cart’s performance to ensure it doesn’t negatively impact your site speed.
Tips for Maintaining Site Speed
Adding features like a sticky Add to Cart button and a mini cart can enhance user experience, but it’s crucial to maintain optimal site speed. Here are some tips to ensure your site remains fast:
1. Optimize Images
Large images can significantly slow down your site. Use image compression tools to reduce file sizes without sacrificing quality. Ensure that all images on product pages are optimized for web use.
2. Use Caching Plugins
Caching plugins can improve your site speed by creating static versions of your pages. Consider using popular caching solutions like WP Super Cache or W3 Total Cache.
3. Minimize HTTP Requests
Every element on your page, including scripts and stylesheets, requires an HTTP request. Reduce the number of elements on your pages, and combine files where possible to minimize these requests.
4. Limit Plugins
While plugins are beneficial, using too many can slow your site down. Regularly audit your installed plugins and remove any that are unnecessary.
5. Utilize a Content Delivery Network (CDN)
A CDN can improve site speed by distributing your content across multiple servers globally. This reduces the load time for users regardless of their location.
Also, check out the useful insight about the customize my account page to enhance your store’s shopping experience!
FAQs
1. What is a sticky ‘Add to Cart’ button?
A sticky ‘Add to Cart’ button is a persistent button that remains visible on the screen as users scroll through a product page, making it easier for customers to add items to their cart.
2. How can a sticky button increase conversion rates?
By simplifying the purchasing process and reducing the effort required to add items to the cart, a sticky button can lead to increased conversion rates and lower abandonment rates.
3. What is a mini cart for WooCommerce?
A mini cart for WooCommerce is a compact cart summary that allows customers to view and manage their selected items without leaving the current page. It enhances the shopping experience by facilitating quicker decisions.
4. Will adding a sticky button slow down my site?
Not necessarily. Using a well-optimized plugin and following performance best practices can help you add a sticky button without significantly impacting your site’s speed.
5. Can I customize the design of the sticky button?
Yes, most sticky button plugins allow you to customize the button’s color, size, text, and position to ensure it matches your store’s branding.
6. How do I test my site’s performance after adding new features?
Use tools like Google PageSpeed Insights or GTmetrix to analyze your site’s load times and performance. This will help you identify any potential issues caused by new features.
7. What should I do if my site slows down after adding a plugin?
If your site slows down after adding a plugin, consider disabling it and checking your site speed again. If it improves, look for an alternative plugin that is more lightweight and optimized.
Conclusion
Adding a sticky Add to Cart button and a mini cart for WooCommerce can significantly enhance the shopping experience for your customers. By making it easier for users to add items to their cart and view their selections, you can improve conversion rates and reduce abandonment rates. With the right plugins, like those offered by Brand Extendons, you can implement these features without compromising your site’s speed. Follow the steps outlined in this article, and ensure you continuously monitor your site’s performance to create an optimal online shopping experience.


